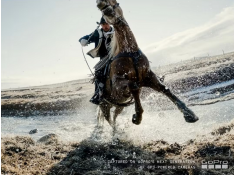
The Ultimate Guide: How To Get Started with Astrophotography
Thursday 18 December 2025
 1.9k
1.9k
 Reproduction without the author's authorization is prohibited


From ancient times to the present, humanity has never stopped gazing at the stars. Astrophotography is a very important part of photography, and also one of the more challenging aspects. This tutorial will teach you: choosing different types of astrophotography, pre-shoot preparation for astrophotography, key points of astrophotography shooting, and post-processing for astrophotography and recommendations for the best shooting locations.
We are honored to sponsor the Appalachian Mountain Club (AMC)’s annual astrophotography event, See the Dark. This event aims to raise awareness of light pollution and reduce the use of unnecessary artificial light sources.
Types of astrophotography
Astronomical photography is a general term that actually encompasses several different methods of photographing the night sky. It can be broadly divided into three types: star trail photography, astrophotography, and deep-sky photography. Each type requires different equipment and has different shooting processes.
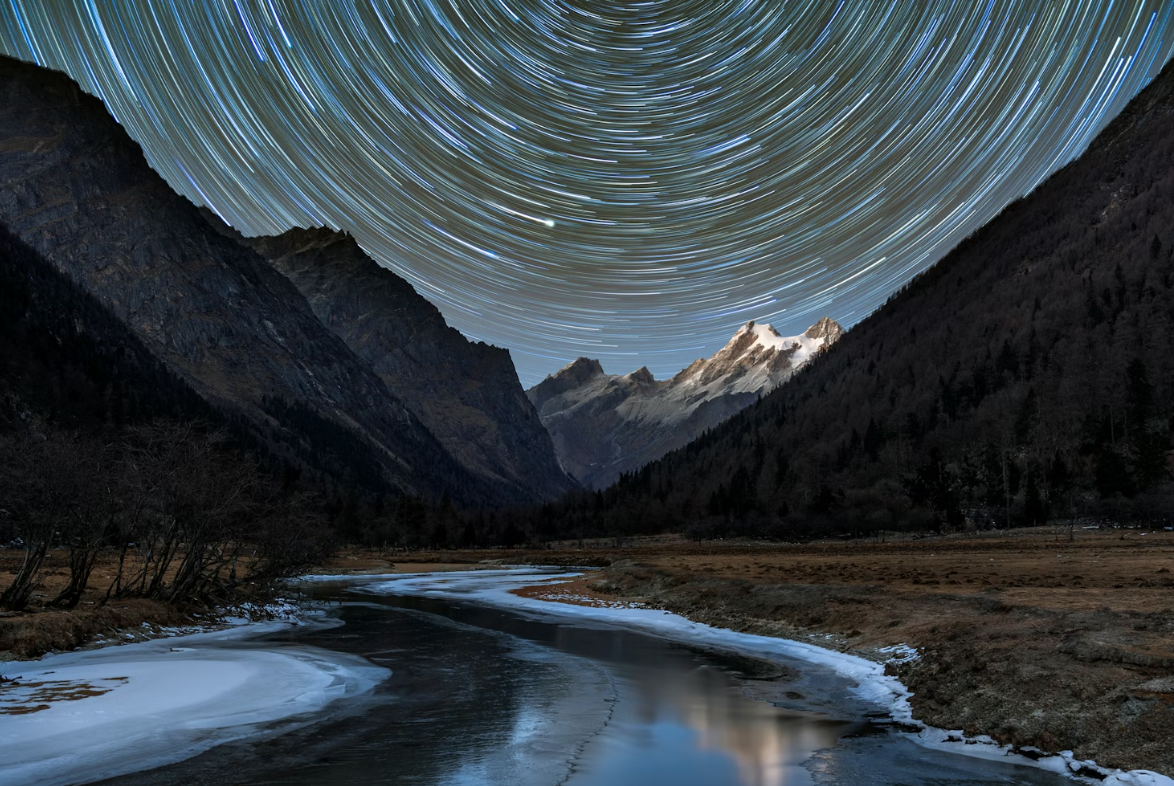
Star trail photography
Essentially, star trail photography is about capturing the Earth's rotation. By definition, it doesn't record the details of the stars themselves, but rather the traces of their movement relative to the horizon.
Example:
Lens: Wide-angle 14–24mm
Aperture: f/2.8–f/4
ISO: 800–1600
Accessories: Camera tripod
Shutter speed: 20–30 seconds per frame, continuous shooting for tens of minutes to several hours
Workflow: Before shooting, compose the shot to determine the proportions of the landscape and sky. Firstly, focus on bright stars and confirm that the landscape position is not off, then start continuous shooting. In post-processing, stack the sky to create continuous star trails, and select one or several landscape images separately for composite to maintain sharpness.
Precautions and Tips
The arcs and concentric circles captured represent the Earth's movement. The equipment requirements aren't extreme; a regular camera, a stable tripod, a wide-angle lens, and a remote shutter release are sufficient. Even the aperture doesn't necessarily need to be particularly large, because you're not focusing on a single shot, but rather the accumulation of time. The shooting method typically involves taking a series of short exposures, such as one every tens of seconds, for one or two hours at a time. Some people try to simplify things by using long exposures, but that will almost certainly result in a blurry photo. Post-processing mainly involves stacking hundreds of images in chronological order to make the stars' movement trails appear continuous. The software used isn't complex, but you need to be able to tolerate the hassle of processing large numbers of files. In terms of color, you need to clean up noise and brightness abrupt changes; otherwise, the trails will appear discontinuous, like a lagging computer.
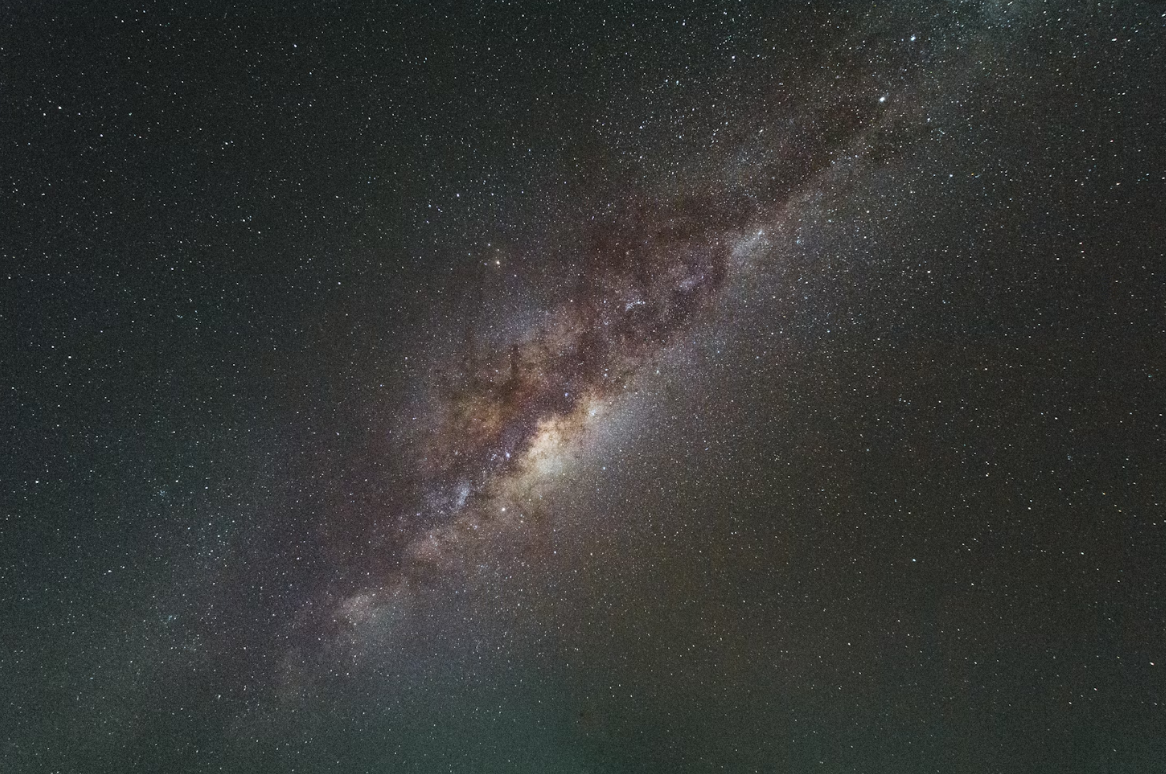
Star photography
Star photography refers to capturing the "static night sky." The core principle is to keep the stars as dots, without streaks, meaning the exposure must be completed before the Earth's rotation becomes significant.
Example:
Lens: Ultra-wide-angle 14–24mm
Aperture: f/2–f/2.8
ISO: 1600–6400
Shutter speed: 10–25 seconds, to avoid star trailing
Accessories: Camera tripod
Workflow: Select the location, manually focus on bright stars, and shoot multiple RAW short-exposure images. You can shoot one set of sky footage and one set of landscape footage. In post-processing, stack the sky footage for noise reduction, adjust color and brightness, and then composite it with the landscape footage.
Precautions and Tips
The focus is on image clarity, star sharpness, and the representation of structures like the Milky Way and airglow, rather than star trails. Equipment requirements are higher than for star trails; wide-angle, large-aperture lenses are more important, and high ISO and low noise performance of the camera body also have a huge impact. A tripod is still essential, but unlike star trails, you won't be afraid to move your camera in the dead of night. Exposure time is limited by the Earth's rotation, so a single shot is usually around ten seconds. Poor parameter control can make stars appear as "rice grains." Post-processing depends on personal aesthetics; some aim for a natural look, while others like to stretch the Milky Way, like in an animated film. But regardless, noise reduction, contrast control, and color correction are unavoidable. Excellent photos rely on post-processing to bring out details in the shadows, but overdoing it can result in an artificial, plastic-like appearance.
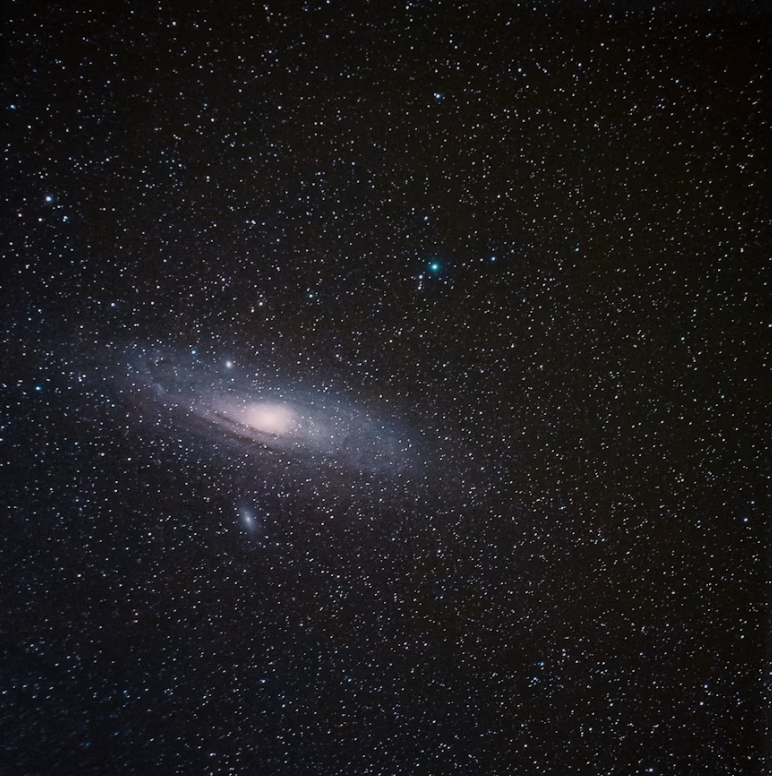
Deep-sky photography
Deep-sky photography follows a completely different logic, targeting faint celestial objects invisible to the naked eye, such as nebulae, galaxies, and globular clusters. The equipment requirements and skill level are doubled.
Example:
Lens/Telescope: Medium telephoto 200–400mm or astronomical telescope
Aperture: f/4–f/6.3 (depending on lens or telescope aperture)
ISO: 800–1600 (camera) or moderate gain (astronomical camera)
Shutter speed: tens of seconds to several minutes (requires equatorial mount tracking)
Workflow: Polar alignment, shooting light frames, shooting dark, offset, and flat fields for correction. Post-processing: alignment, correction, stacking, noise reduction, and moderate enhancement of nebula details and colors.
Precautions and Tips
By definition, it's no longer simply "shooting the night sky," but rather conducting small-scale astronomical observations. Ordinary tripods are completely inadequate; an equatorial mount is needed to counteract the Earth's rotation, allowing the camera to move with the stars, enabling long exposures of several minutes or even tens of minutes per shot. Lenses are no longer wide-angle; focal lengths are often hundreds to thousands of millimeters, sometimes even requiring a telescope. To further improve the signal-to-noise ratio, specialized astronomical cameras are used, along with various narrowband filters such as Hα, OIII, and SII to directly eliminate light pollution and clutter. Post-processing is far more complex than the previous two methods. You need to correct, align, and stack dozens to hundreds of individual images, then perform channel-by-channel processing, noise reduction, sharpening, and star separation—a challenging process. Any step that's overdone can render the nebula look like a fake model.
Preparation for Astrophotography
Before heading out for an astrophotography trip, the prep work matters more than most people expect, and how thorough you are basically decides whether you’ll bring back anything usable. Weather and air quality are the basics you can’t shortcut. You need to look at light-pollution levels, cloud movement, and the moon phase ahead of time. If these conditions don’t line up, even the best gear won’t save your photos. It also helps to visit the shooting spot during the day—check the terrain, possible foregrounds, where you’ll be pointing the camera, any stray lights nearby, and whether the place is safe to move around at night.
Gear prep is just as important. Astrophotography relies on long exposures, so stability is everything. Your tripod needs to be solid. Your backpack should fit the camera, lenses, batteries, headlamp, filters, and all the small essentials, while still being comfortable enough for long walks. As for filters, things like soft filters or mild light-pollution reduction filters can help in certain situations, but they can’t fix bad sky conditions. Treat them as optional tools, not magic solutions.
On top of that, spare batteries, memory cards, moisture-proof layers, warm clothing, basic first-aid items, and mosquito repellent are all easy to overlook but absolutely matter. Missing any of these can make a long night shoot much harder than it needs to be. Mental prep matters too. Astrophotography demands patience and a high tolerance for trial and error—cold temperatures, long waiting, repeated attempts, and sometimes only a handful of decent shots. If this part isn’t something you’re ready for, the whole experience can turn unnecessarily frustrating.
General tips on the process of astrophotography
Stability & Focusing
The factors that truly affect your final image are often the small details that seem harmless but can ruin an entire set of photos. Stability is always the top priority. If the tripod shakes even slightly, the head isn’t fully locked, or the shutter cable isn’t secure, the whole sequence is basically unusable. Focusing is just as critical. Autofocus is almost never reliable for this kind of work, so it’s better to use live view, lock focus manually on the brightest star, zoom in, and actually check it. Don’t assume it’s correct—many people think they’ve focused at infinity, only to find everything blurry once they get home. Exposure may look straightforward, but long exposures or continuous shooting amplify thermal noise, star drag, and sky glow. This is why you should stay skeptical about the surrounding light pollution, the moon phase, and humidity during shooting; the “it should be fine” mindset is exactly what causes ruined footage.
Accessories & Setting
Batteries and storage are equally easy to overlook. Long bursts of continuous shooting drain power much faster than normal use, and the colder it is, the worse it gets. If the camera shuts down halfway, your stack will end up with gaps. It’s best to format your memory card beforehand and make sure its write speed can handle continuous shooting; otherwise you may get stutters or dropped frames. As for camera settings, it’s better to turn off high-ISO noise reduction and long-exposure noise reduction, since both insert a black frame after each shot and completely break the rhythm you need for star trails or stacking. The shooting interval also has to be truly seamless—even a one-second gap can cause visible breaks in the trails. Keep white balance fixed; auto white balance will shift tones between shots, which becomes a headache when stacking.
Environment & Composition
Environmental factors are another area where you can’t afford wishful thinking. Wind will shake star points, humidity will fog up your lens, and temperature shifts can throw focus off. It’s best to bring some sort of moisture protection, a lens heater, or at least something to wipe the glass. Before shooting, check the actual sky conditions instead of relying on the weather forecast and hoping it clears up. Composition also needs to be planned ahead. The direction of star trails depends on where the camera is facing; you may imagine a clean arc in your final frame, only to find a crooked set of straight lines when you get home. Mistakes like these happen far more often than most people think.
General Tips on the post-processing of astrophotography
Consistency
The first priority is consistency across all frames. Whether you are reducing noise or stacking, the workflow relies on uniform material—exposure, color temperature, contrast, vignetting, and overall brightness should match as closely as possible. Any frames that are noticeably shifted in brightness or color will create visible blotches, seams, or uneven patches in the final result. Before importing, it’s necessary to review the sequence and remove frames that show camera shake, missed focus, stray light, or sudden brightness changes, because these problems become even more obvious once stacked.
Thermal noise and hot pixels are the next major concern. Long exposures and warm conditions tend to emphasize them. Regardless of whether you plan to use dark frames, hot-pixel compensation, or an averaging-based stacking method, you need to ensure that dark frames or correction data are properly prepared. If not, the final stacked image will show dense clusters of colored noise that are almost impossible to fix afterward. Software can correct structured noise patterns, but it cannot repair inconsistency in the source material.
Alignment
Star alignment is another point that must be checked carefully. For star-point stacking, the stars need to be aligned with precision; otherwise, they will appear doubled or distorted. For star trails, the opposite is required—no star alignment, allowing the motion to create continuous trails. Misalignment settings will produce unusable results, so it’s important to verify the alignment both before and after the software processes it.
Smoothness of brightness transitions is equally important. Natural night skies contain brightness variations—darker foregrounds, a brighter sky, and even stronger brightness near the Galactic core. If the individual frames vary too much in brightness before stacking, the final image will reveal intensified vignetting, banding, or segmented light transitions. This is why each frame should be adjusted to match a consistent baseline, ideally using synchronized settings.
Color consistency also matters. Any frame captured with a different white balance or auto-adjusted color will introduce exaggerated color shifts after stacking. The best approach is to choose one clean, well-exposed frame as the reference and synchronize all color settings before processing. Attempting to correct color only after stacking usually cannot fully remove the artifacts introduced by inconsistent source material.
Noise Reduction
Noise reduction should also be applied with caution. Deep-sky and night-sky images contain faint stars that can be mistaken for noise when aggressive noise reduction is applied. Excessive smoothing will erase genuine detail and leave the final result looking flat and artificial. Subtle and targeted noise control is more appropriate.
When the image includes both sky and foreground, the two areas need to be processed separately. The sky moves, while the foreground remains static, so stacking them together will blur the landscape or distort the stars. Using different alignment methods for sky and ground and then blending them is often necessary to maintain clarity in both areas.
Finally, checking the edges of the frame is essential. Lens aberrations and small alignment shifts accumulate across a stack, making the corners prone to bright fringes, color shifts, or slight ghosting. Reviewing the corners at high magnification is a step that should not be skipped.
Gallery of the Night


Statement: all contents and remarks made by K&F CONCEPT 's intranet friends only represent themselves and do not reflect any K&F CONCEPT 's opinions and views.
-
 GoPro Announces Next-Generation AI Image Processor GP3Wednesday 04 March 2026
 -
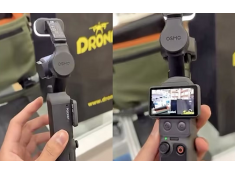 DJI Pocket 4 User Manual LeakedMonday 02 March 2026
 -
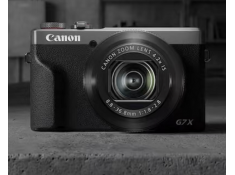 Canon: Next Compact Camera to Pack with Cutting-Edge TechnologySaturday 28 February 2026
 -
 Waist-Level Viewfinder! Canon Showcases Retro-Style Concept CameraThursday 26 February 2026
 -
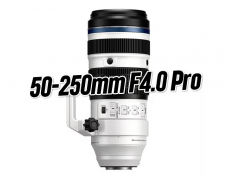 OM SYSTEM 50-250mm F4.0 Pro lens is developingWednesday 25 February 2026


 Your account requires approval before you can login.


